SMS Server Settings
ADSelfService Plus can send SMS notifications using:
Configuring ADSelfService Plus to use a GSM Modem
GSM modem prerequisites:
- Support for 7-bit, 8-bit, and 16-bit encoding.
- The modem must be connected to the serial communication port.
Follow these steps :
- Connect the GSM modem to the serial communication port of the server.
- Go to Admin → Product Settings → Mail / SMS Settings.
- Click the SMS Settings tab. From the SMS Provider drop-down, select GSM modem.
- Enter the port number the modem is connected to in Modem Port Number.
- Click Advanced Settings.
- Provide the Modem Port Speed.
- Specify the Message Centre Number and SIM PIN Number.
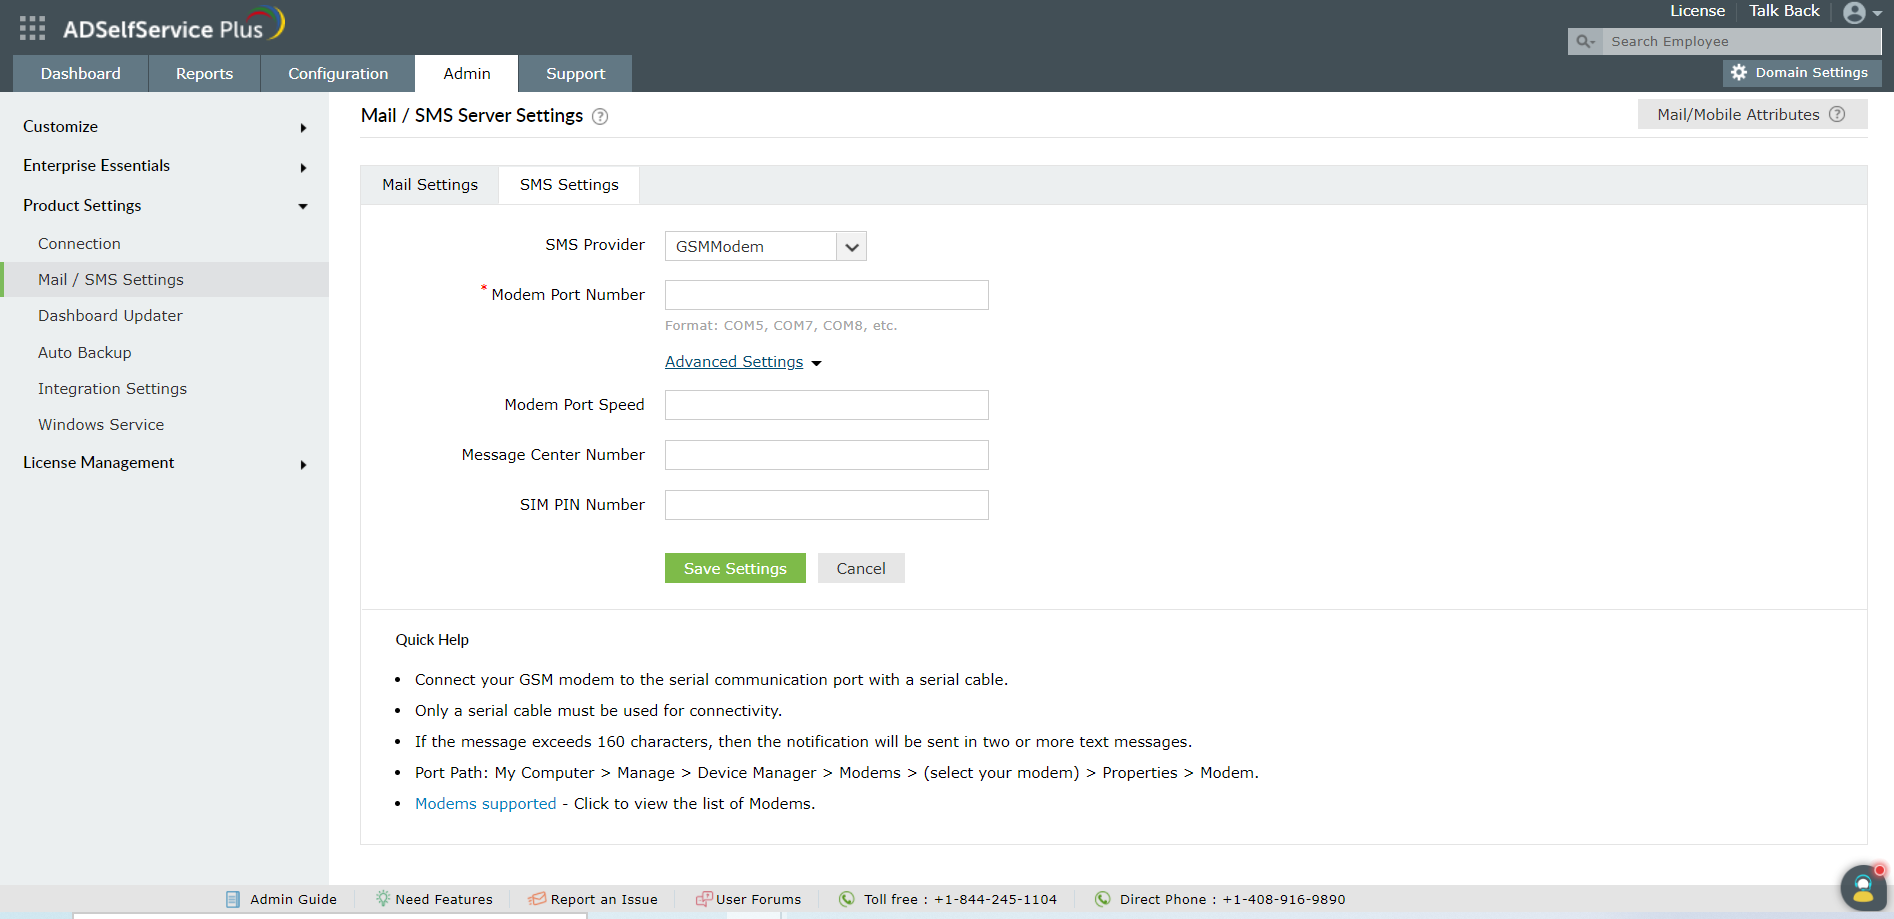
Note :If the content exceeds 160 characters, it will be sent as multiple messages. To find the modem port, go to My Computer → Manage → Device Manager → Modems → (select your modem) → Properties → Modem
Configuring ADSelfService Plus to use Clickatell
Prerequisites:
- To use Clickatell as the SMS provider, you need a product license with an SMS add-on pack (AdventNetLicense.xml) and an SMS Gateway license file (SMSGateway.xml). For more details, click here.
- If your organization already has an account with Clickatell, click here for custom SMS gateway configurations.
Follow these steps :
- Log in to ADSelfService Plus with admin credentials.
- Go to Admin → Product Settings → Mail / SMS Settings.
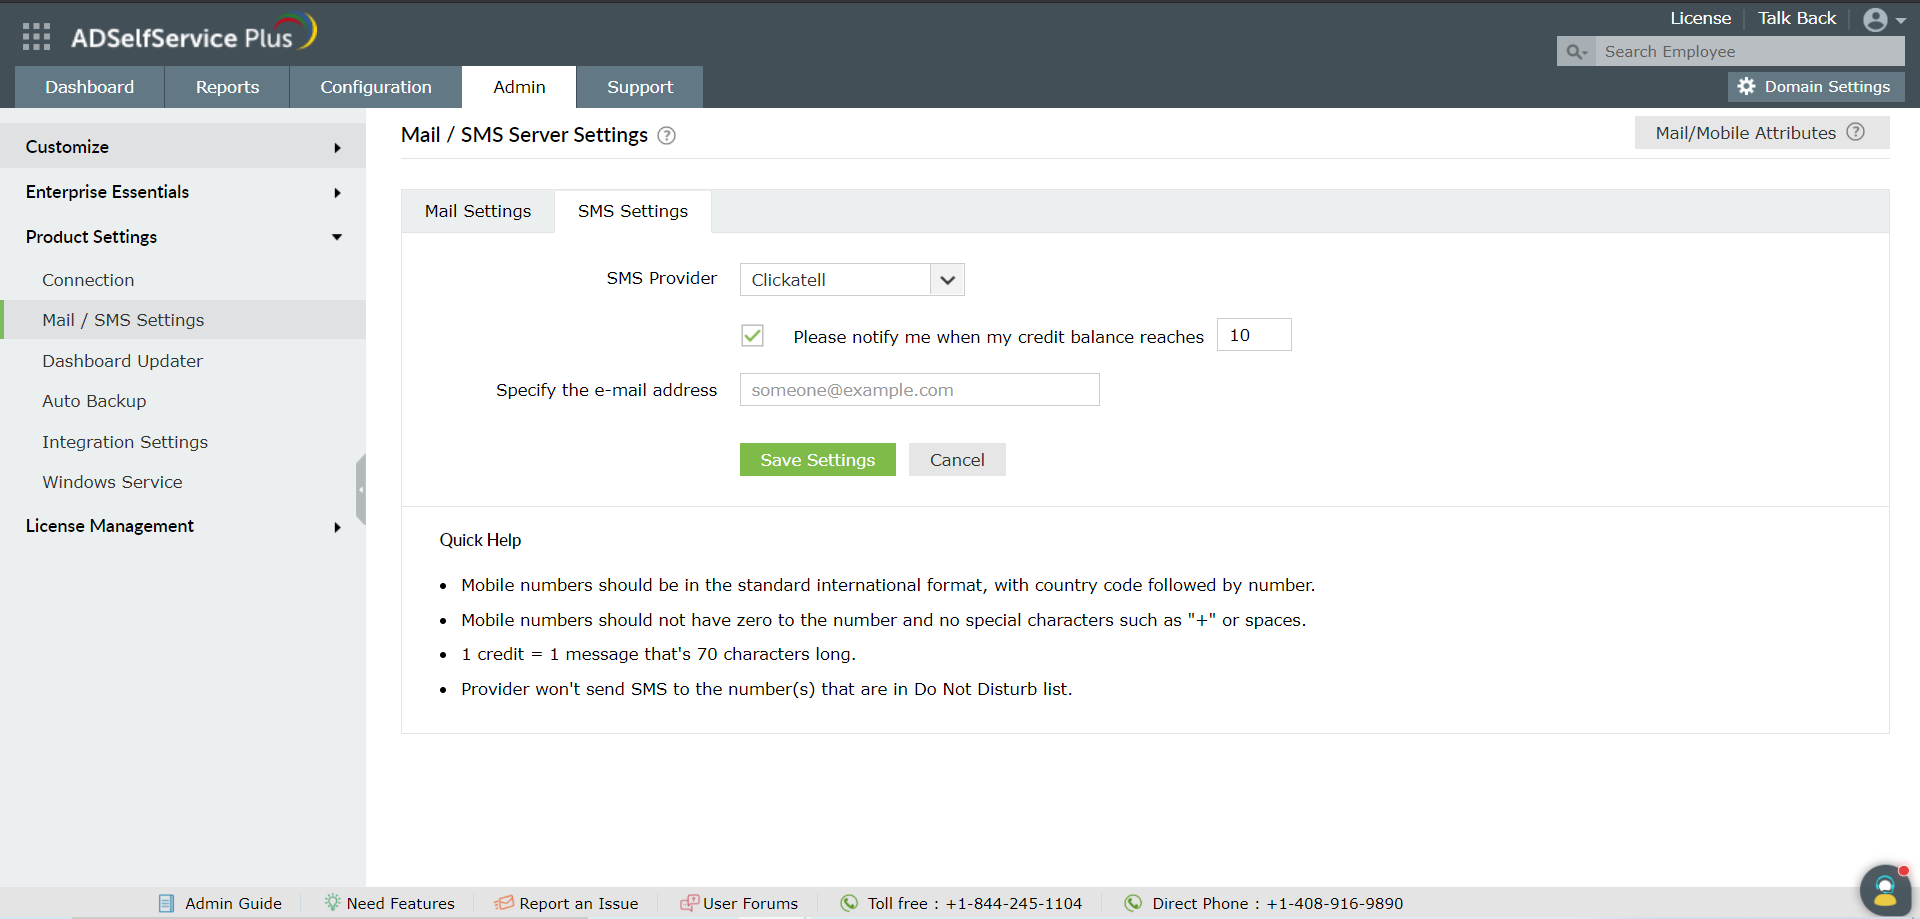
- Click the SMS Settings tab. From the SMS Provider drop-down, select Clickatell.
- Select the Please notify me when my credit balance reaches checkbox and specify the number of credits
- Enter the email address to which the notification alert must be sent.
- Click Save.
Buying SMS credits
View our pricing details and select a plan based on your requirements. If your organization needs more than 100,000 credits, we can offer you a personalized quote. To install the SMS add-on pack, follow the steps below.
Steps to install the Clickatell SMS add-on:
After the purchase is successful, our support team will send you two XML files: AdventNetLicense.xml and SMSGateway.xml.
- Click the License link at the top-right corner of the webpage
- In the window that opens, click Choose File and upload the AdventNetLicense.xml file, which contains details on the SMS credit limit.
- You will now be asked to provide the API settings. Upload the SMSGateway.xml file you received.
Note:
Make sure that users’ mobile numbers are in the international format, with the country code followed by the number. The entered mobile numbers should not start with a zero or include special characters such as "+" or spaces (e.g. “111234123456”).
Users on the Do Not Disturb list will not receive SMS alerts.
A message of up to 70 characters uses one credit.
Configuring ADSelfService Plus to use a custom SMS gateway
ADSelfService Plus can be integrated with custom SMS providers as well.
HTTP-based custom SMS gateway:
Follow these steps for ADSelfService Plus to use an HTTP-based custom SMS gateway:
- Log in to ADSelfService Plus with admin credentials.
- Go to Admin → Product Settings → Mail / SMS Settings
- Click SMS Settings tab. From the SMS Provider drop-down, select Custom.
- Select HTTP from the Send SMS via drop down box.
- Select either of the available HTTP methods. That is, Post or Get.
- Enter the HTTTP URL of your SMS gateway provider.
- Specify the HTTP Parameters specific to your SMS provider, the user's mobile number, and the message to be sent.
Note:
Separate the HTTP parameters with an ampersand (&) sign.
Example format: username=xxx&password=yyy&mobileNumber=%mobNo%&message=%message%&messageId=%uniqueId%&timeStamp=%currentTime%
&expiryTime=%expiryTime%.
- xxx = API authentication username.
- yyy = API authentication password.
- %mobNo% = this macro denotes the user's mobile number.
- %message% = this macro denotes the SMS message content.
- %uniqueId% = to send a random integer as a unique ID for each message request.
- %currentTime% = to send the current timestamp of the message request.
- %expiryTime% = to specify the time at which the message request expires.
More HTTP Parameters - If you SMS provider requires more parameters like unicode and apiID, include them as well using the '&' sign.
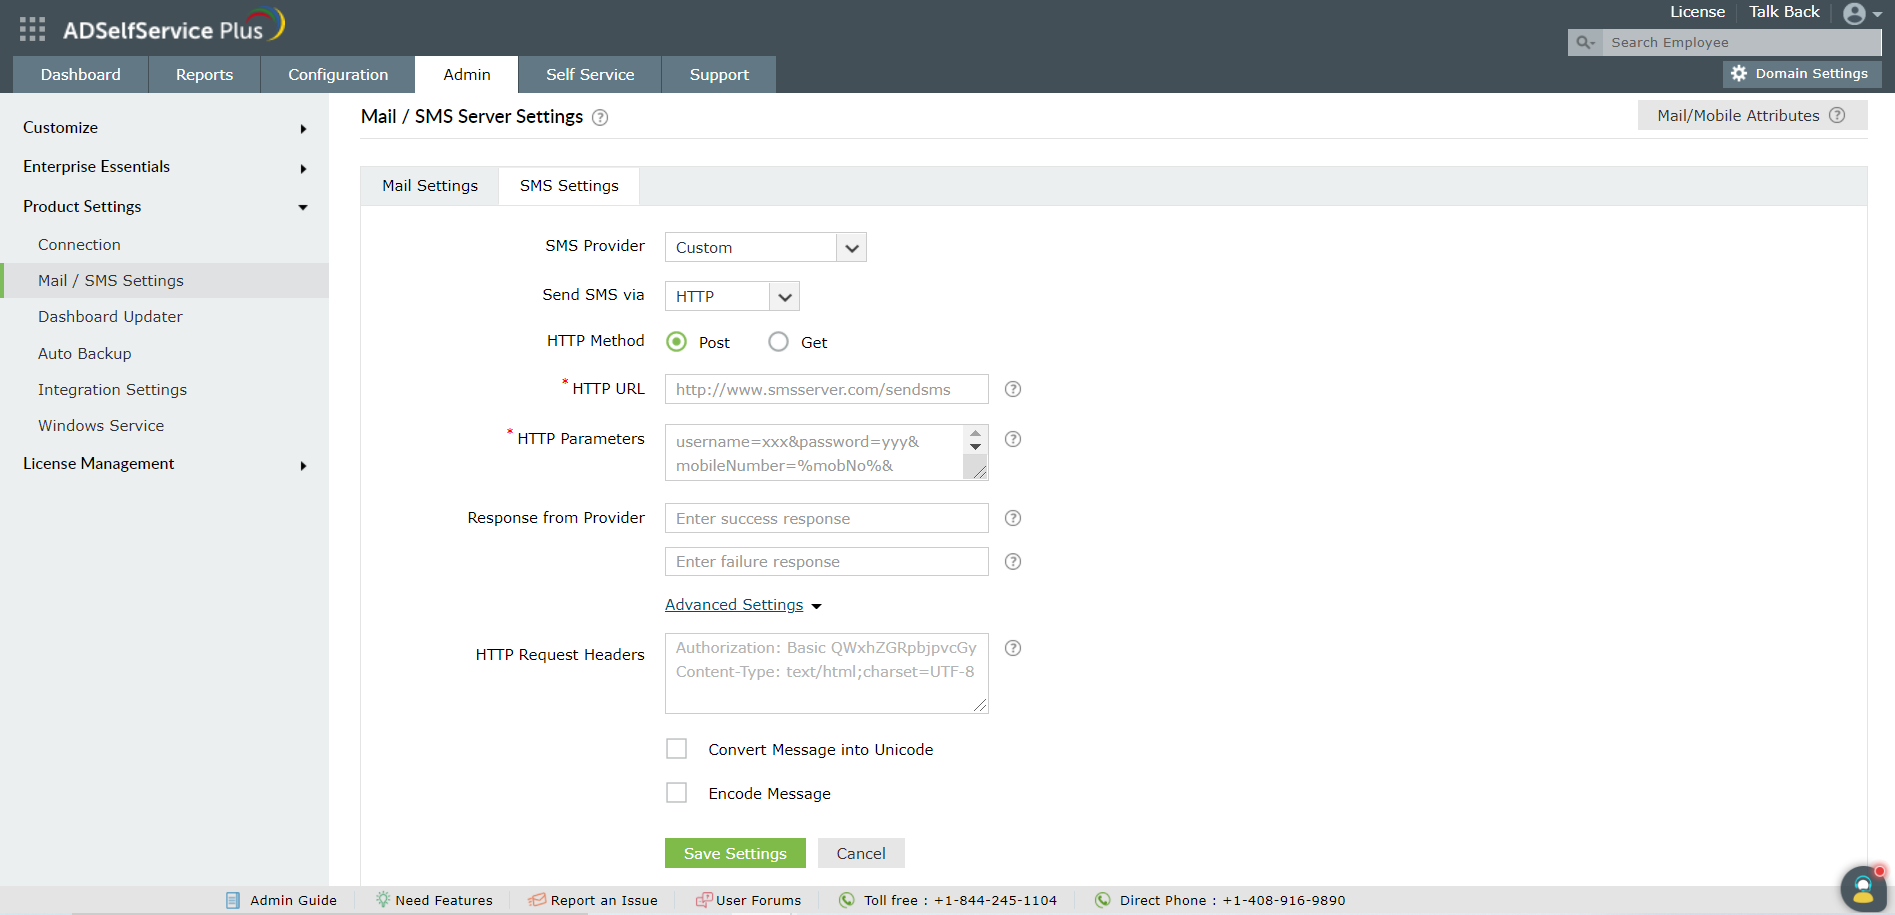
- Specify the Success and Failure response from the provider.
- Enter the HTTP Request Headers specific to your SMS provider.
- If the SMS provider expects unicoded or encoded messages, select Convert Message into Unicode or Encode message respectively.
- Click Save Settings.
SMTP-based custom SMS provider
Follow these steps for ADSelfService Plus to use an SMTP-based custom SMS gateway:
- Log in to ADSelfService Plus with admin credentials.
- Go to Admin → Product Settings → Mail / SMS Settings
- Click SMS Settings tab. From the SMS Provider drop-down, select Custom.
- Select SMTP from the Send SMS via drop down box.
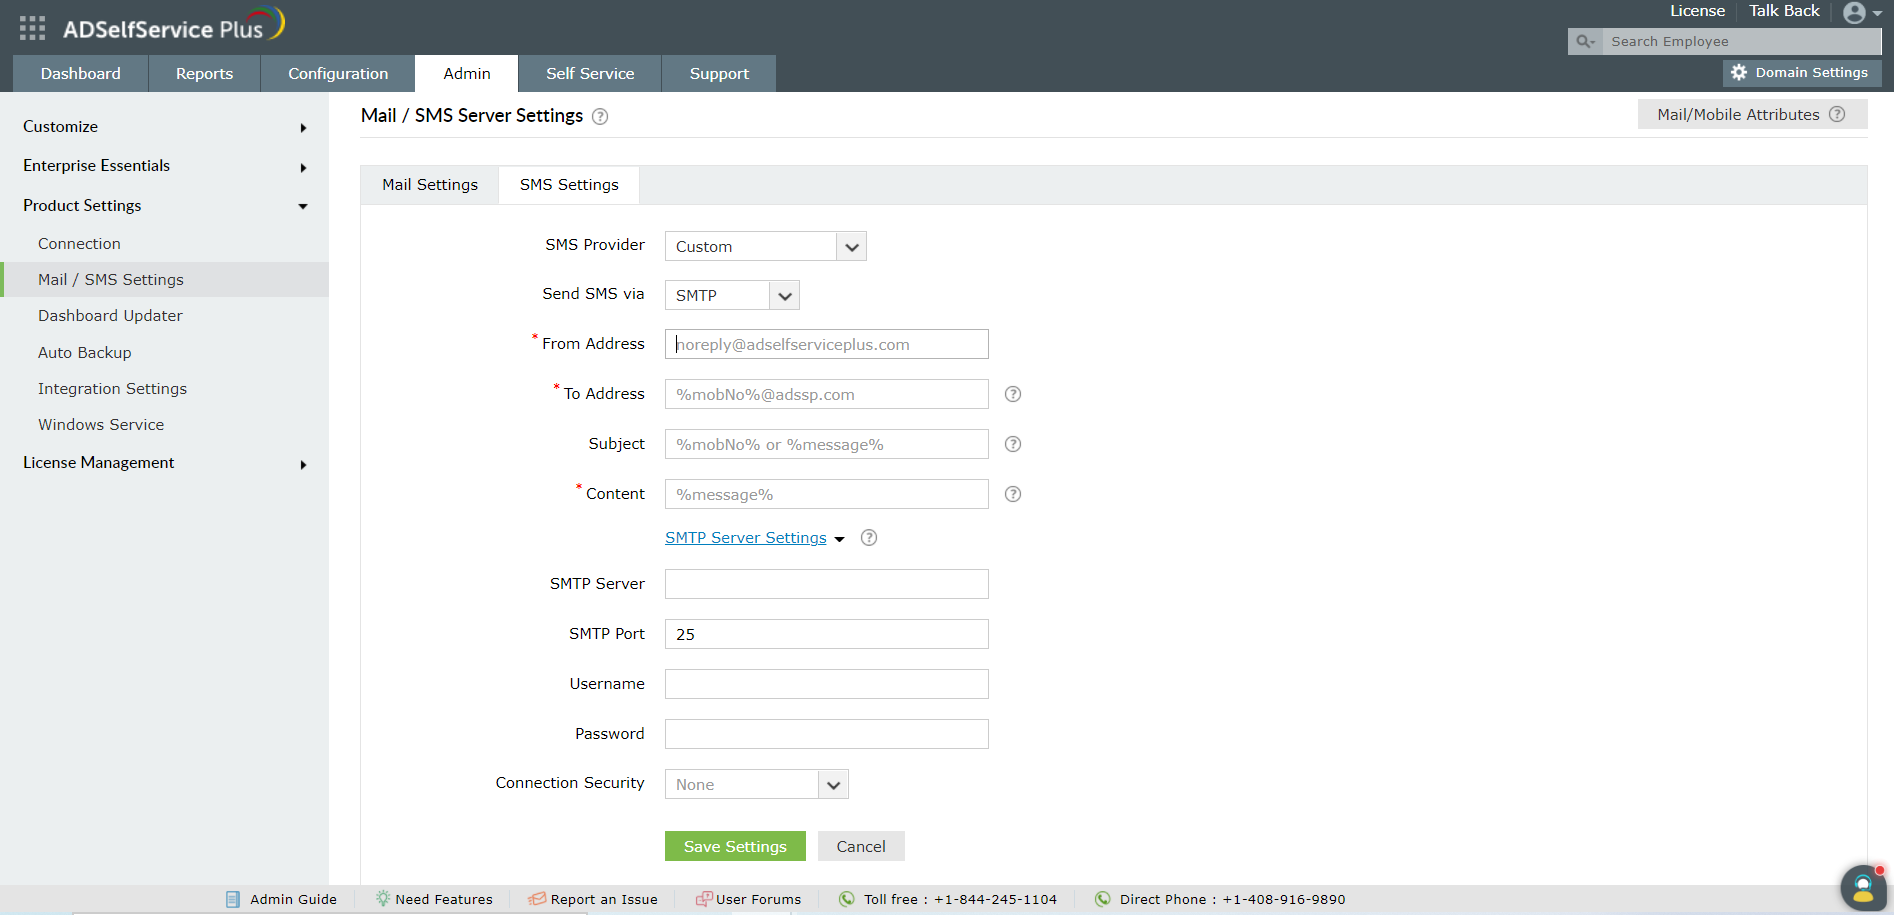
- Enter the email address the SMS will be sent in the From Address field.
- Specify the mobile number macro (%mobNo) followed by the email address of the SMS provider in the To Address field.
For example, %mobNo%@clickatell.com. For more details, contact your SMS provider.
- Provide the required Subject. Generally, it is either the mobile number or the message, depending on your SMS provider.
- Specify the Content to be sent
- Click SMTP Server Settings.
- Enter the name or the IP address of the SMTP Server, and the SMTP Server port.
- Provide the Username and Password with required permissions on the SMTP server.
- Select Connection Security from the drop-down, and click Save Settings.
Note:
If the SMTP server is not configured, the mail server configured under the
Mail Settings tab will be used.
SMPP-based custom SMS provider
Follow these steps for ADSelfService Plus to use an SMPP-based custom SMS gateway:
- Log in to ADSelfService Plus with admin credentials.
- Go to Admin → Product Settings → Mail / SMS Settings
- Click SMS Settings tab. From the SMS Provider drop-down, select Custom.
- Select SMPP from the Send SMS via drop down box.
- Enter the SMPP Server Name and SMPP Server Port number.
- Specify the User Name and Password with required permissions on the SMPP server. Click Advanced Settings.
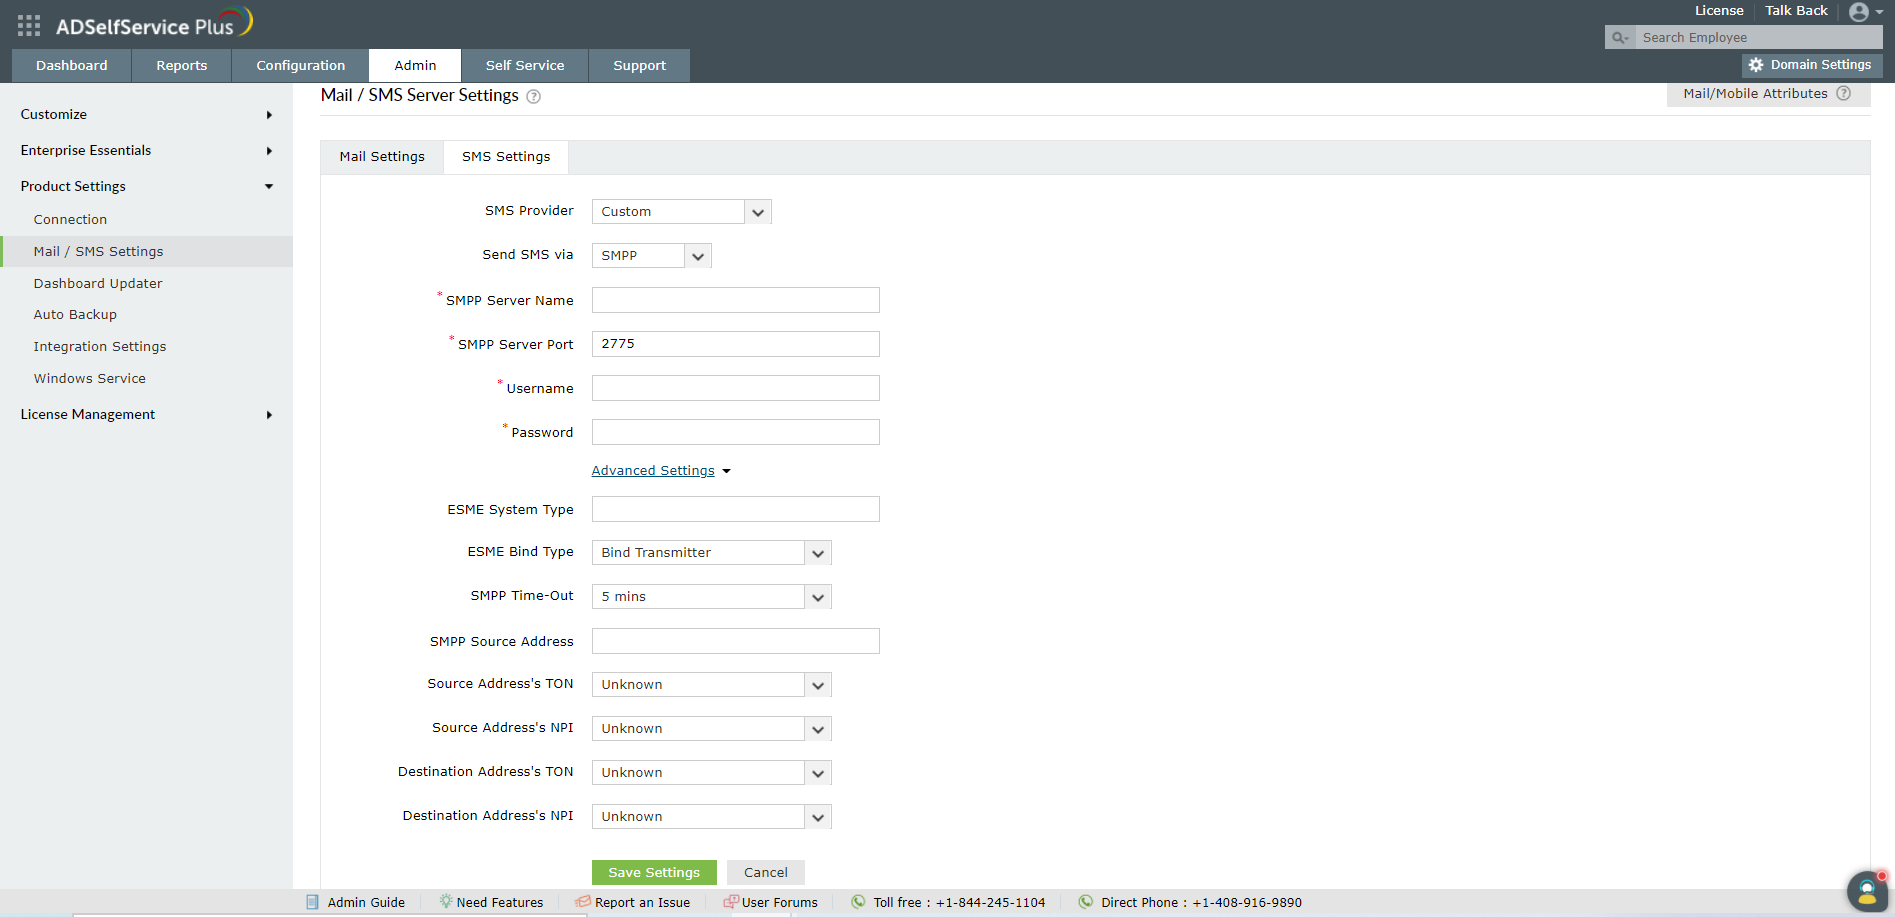
- Enter the ESME System Type. From the ESME Bind Type drop-down, select Blind Transmitter or Transceiver.
- Specify the SMPP Time-Out and SMPP Source Address.
- Select the Source Address’ TON,Source Address’ NPI, Destination Address’ TON, and Destination Address’ NPI from the respective drop-downs.
- Click Save Settings.
Note:
TON: Type of number
NPI: Numeric plan indicator


