Configure OAuth or OpenID Connect SSO for custom application

ADSelfService Plus supports SSO configuration to any OAuth/OpenID Connect-enabled custom enterprise application. In this page, we discuss the steps to configure OpenID Connect-based SSO for custom applications.
Prerequisite

  1. Log in to Service Provider (custom application for which you want to configure OpenID Connect) using administrator credentials.
  2. Get Authorization redirect or callback URL(s) from the service provider.

Create custom application in ADSelfService Plus

  1. Log in to ADSelfService Plus using administrator credentials.
  2. Navigate to Configuration > Self-Service > Password Sync/Single Sign On.
  3. Click Add Application.
  4. Click on Custom Application option in the left pane.
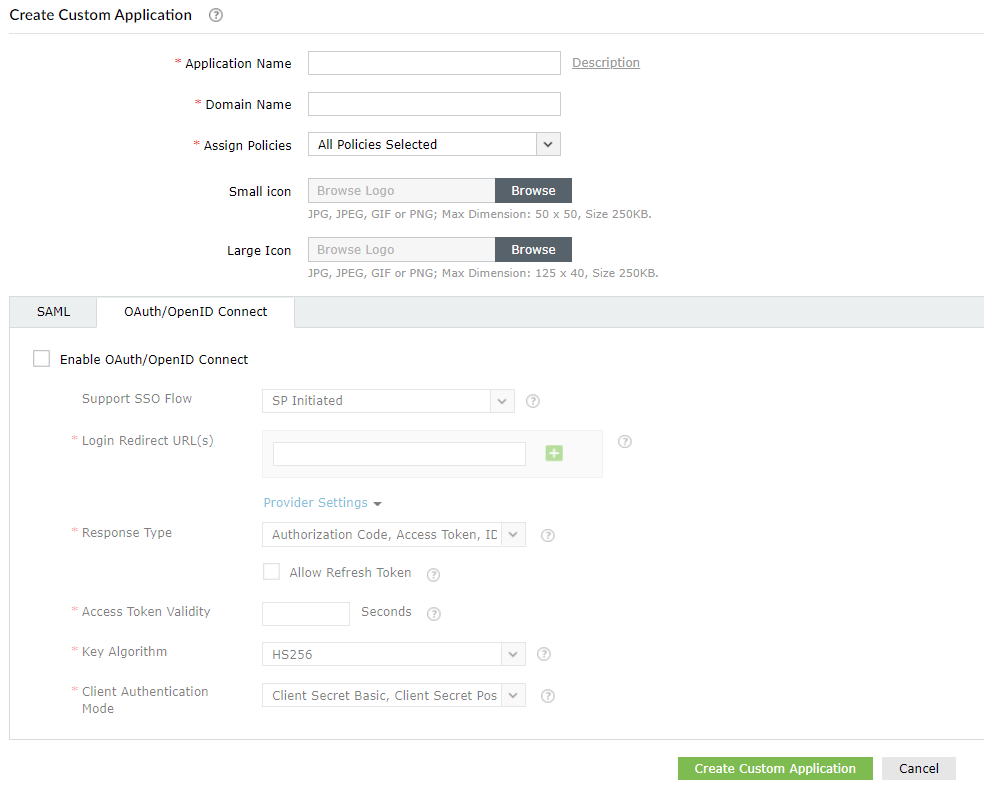
  5. Enter a suitable Name and Description for the application.
  6. Enter the Domain Name of your application account. For example, if your username is johndoe@thinktodaytech.com, then thinktodaytech.com is your domain name.
  7. Choose the policies you want to assign from the Assign Policies drop-down.
  8. You can also add a small or large Icon of the application, if required.
  9. Configure Oauth or OpenID Connect SSO for custom application
  10. Under the OAuth/OpenID Connect tab, select the Enable OAuth/OpenID Connect checkbox.
  11. From the Support SSO Flow drop-down, choose SP Initiated or IdP Initiated.
  12. Note:It is advisable to contact your Service Provider (custom application) and verify the supported SSO flow before choosing the correct option.

    If you select SP Initiated flow:

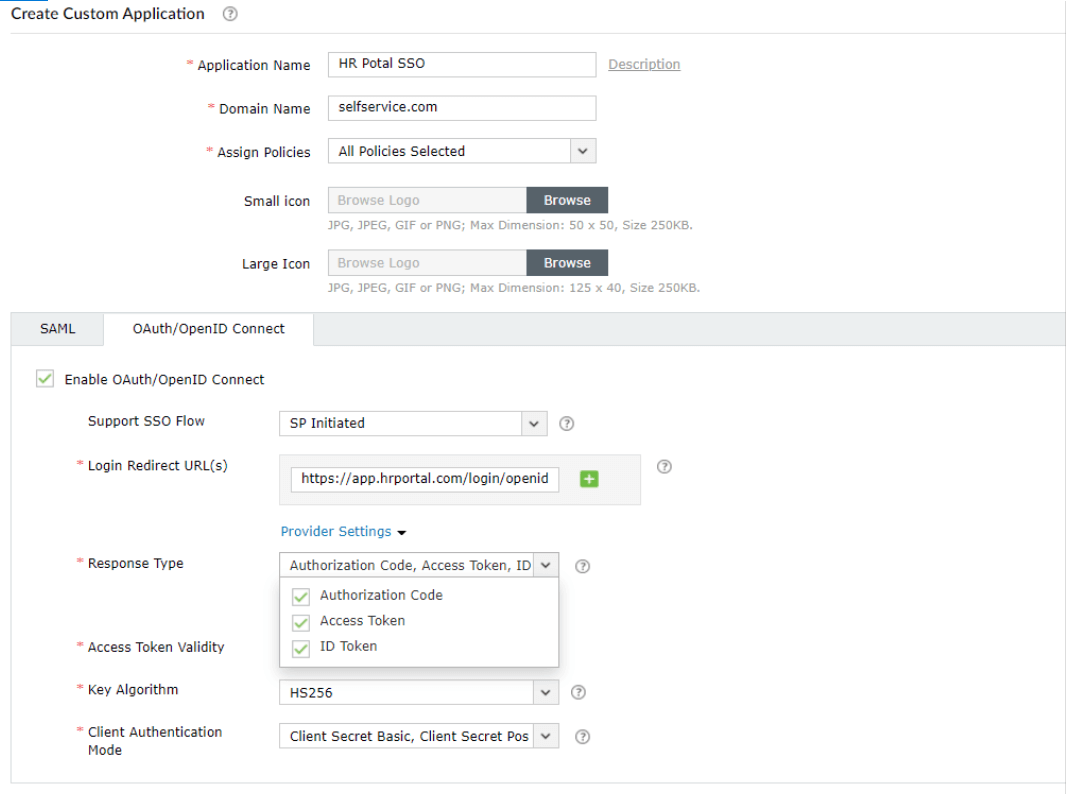
    In the Login Redirect URL(s) field, enter all the available Authorization redirect or callback URL(s) obtained from your Service Provider in step 2 of pre-requisites. The URL(s) can be found in the Service Provider's OAuth/OIDC SSO configuration page.
    Configure Oauth or OpenID Connect SSO for custom application

    If you select IdP Initiated flow:

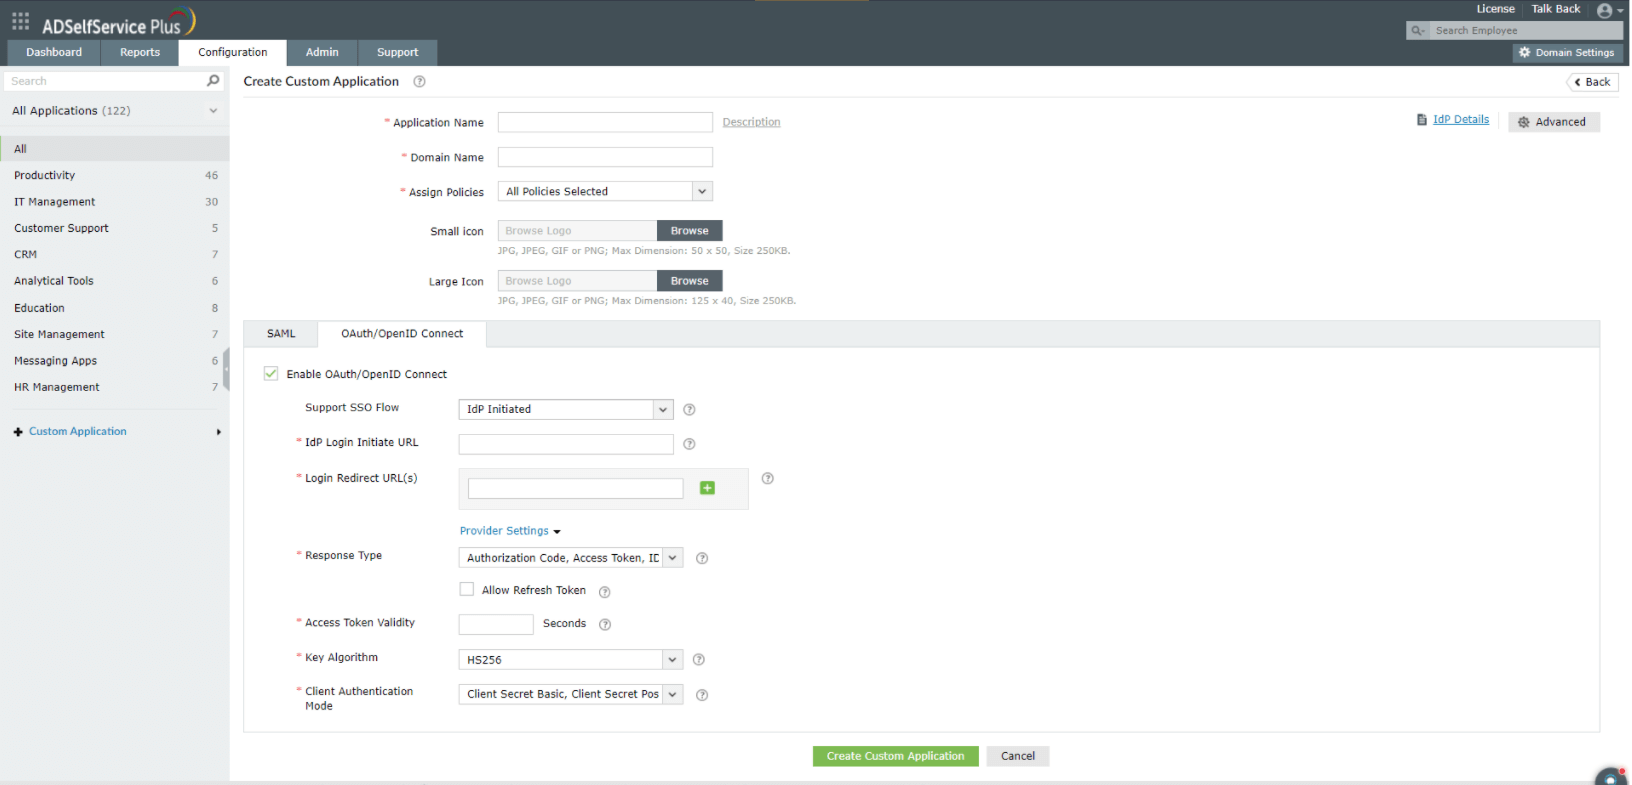
    The IdP Login Initiate URL, is used to send id_token from Identity Provider to Service Provider. Once this URL is configured, the users will be able to log in to the Service Provider by clicking on that particular application in the Applications tab in ADSelfService Plus.

    In the Login Redirect URL(s) field, enter all the available Authorization redirect or callback URL(s) obtained from your Service Provider in step 2 of pre-requisites. The URL(s) can be found in the Service Provider's OAuth/OIDC SSO configuration page.
    Configure Oauth or OpenID Connect SSO for custom application
  13. Under Response Type, choose one or many options from Authorization code, Access Token and ID Token.
  14. Note:This value will be reflected in the Well-known configuration section under IdP details, and shared to Service Provider application. Response Type is used to mention the authorization request modes, from Service Provider to Identity Provider. This can be chosen based on the Service Provider's login requirement.
    • Authorization code - By using this response type, the Identity Provider (IdP) sends an authorization code to the Service Provider, after successful authorization request. With this authorization code, Service Provider then sends an access token request to the IdP. Using this access token the Service Provider obtains user information to perform user login.
    • Access Token - By using this response type, the Identity Provider (IdP) sends an access token to the Service Provider, after successful authorization request. Using this access token, the Service Provider obtains user information to perform user login.
    • ID Token - By using this response type, the Identity Provider (IdP) sends an ID token to the Service Provider, after successful authorization request. Using this ID token, the Service Provider obtains user information to perform user login.
  15. Tick the Allow Refresh Token checkbox, to allow the Service Provider to obtain access tokens without needing the user to re-authenticate every time.
  16. The Access Token Validity field is set to 3600 seconds by default. You can change this value if required.
  17. Note:Access Token Validity denotes the time limit for which the token sent by the Identity Provider would be accessible by the Service Provider.
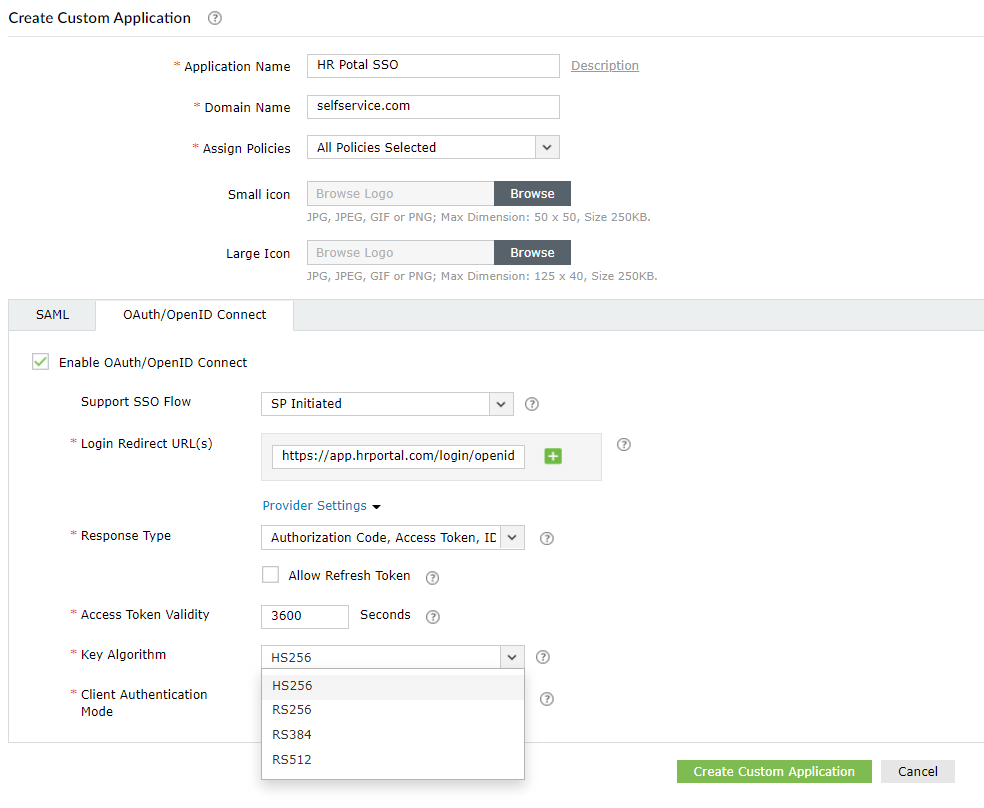
  18. Choose Key Algorithm as HS256, RS256, RS384 or RS512 depending on the algorithm used for Access Token or id_token signature.
  19. HS256 - A symmetric algorithm that uses one shared secret (i.e. client_secret generated during custom application creation in IdP), to sign and validate the token instead of using a public key pair.

    RS256 - RSA signature with SHA-256. It is an asymmetric algorithm which uses a public or private key pair, generated and managed by IdP (the IdP uses the private key to generate the signature, and the application uses a public key to validate the signature).

    RS384 - Same as RS256. Only difference is this uses a SHA-384 hashing algorithm for creating the RSA signature.

    RS512 - Same as RS256. Only difference is this uses a SHA-512 hashing algorithm for creating the RSA signature.
    Configure Oauth or OpenID Connect SSO for custom application
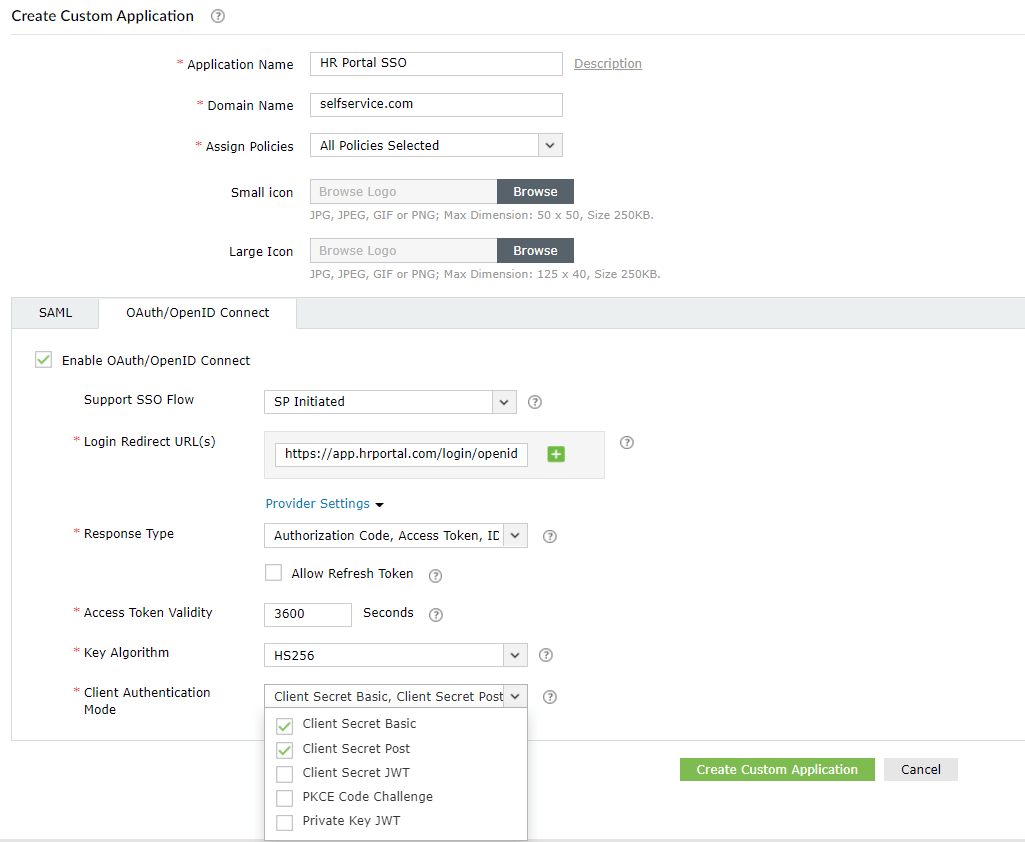
  20. From the Client Authentication Mode drop-down, choose the modes required. These are the modes using which the IdP will authenticate the Service Provider's access token request.
  21. Client Secret Basic: The IdP generates a client_id and client_secret and shares it with the Service Provider in advance. While sending access token request, the Service Provider, encodes the client_id and client_secret in BASE64 and sets it in the authorization header. The IdP verifies this authorization header to authorize the request.

    Client Secret Post: The IdP generates a client_id and client_secret and shares it with the Service Provider in advance. While sending access token request, the Service Provider, sets the client_id and client_secret in the access token request body. The IdP verifies the client_id and client_secret in the request body to authorize the request.

    PKCE Code Challenge: In this authentication method, the Service Provider generates a random value called code_verifier, which is hashed to form a code_challenge. While sending access token request, the Service Provider sends this code_challenge to the IdP. The IdP checks this code_challenge to authorize the request.

    Client Secret JWT: The IdP generates a client secret (client_secret_jwt) and shares it with the Service Provider in advance. While sending access token request, the Service Provider, uses this secret to generate a digital signature. The IdP checks for the signature to authorize the request.

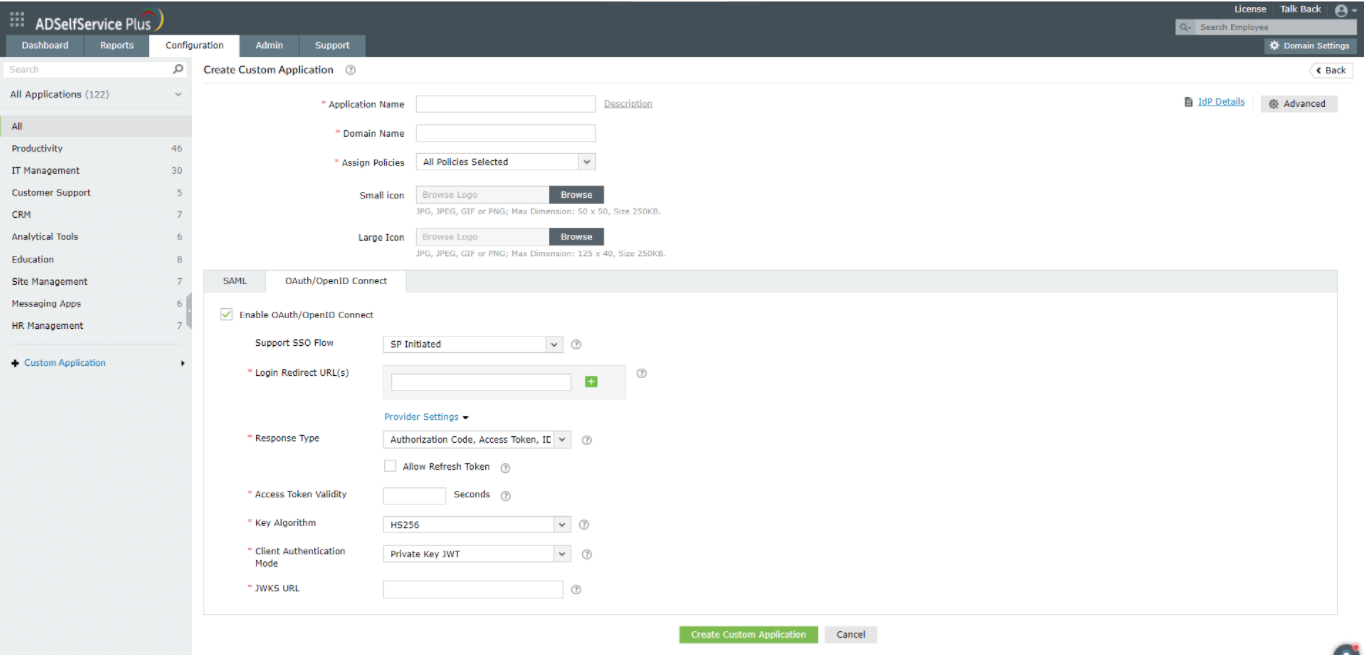
    Private Key JWT: The IdP gets a JWKS URL (JSON web key set) from the Service Provider that consists of a public key. While sending access token request, the Service Provider, uses a private key to generate a digital signature. The IdP checks for the signature using the public key obtained from JWKS URL, to authorize the request.
    Configure Oauth or OpenID Connect SSO for custom application
  22. On choosing the Private Key JWT mode, ADSelfService Plus will need the JWKS URL details from the Service Provider to obtain the public key, which will then be used to verify the signature.
  23. Configure Oauth or OpenID Connect SSO for custom application
  24. Click on Advanced Configuration in the top-right corner.
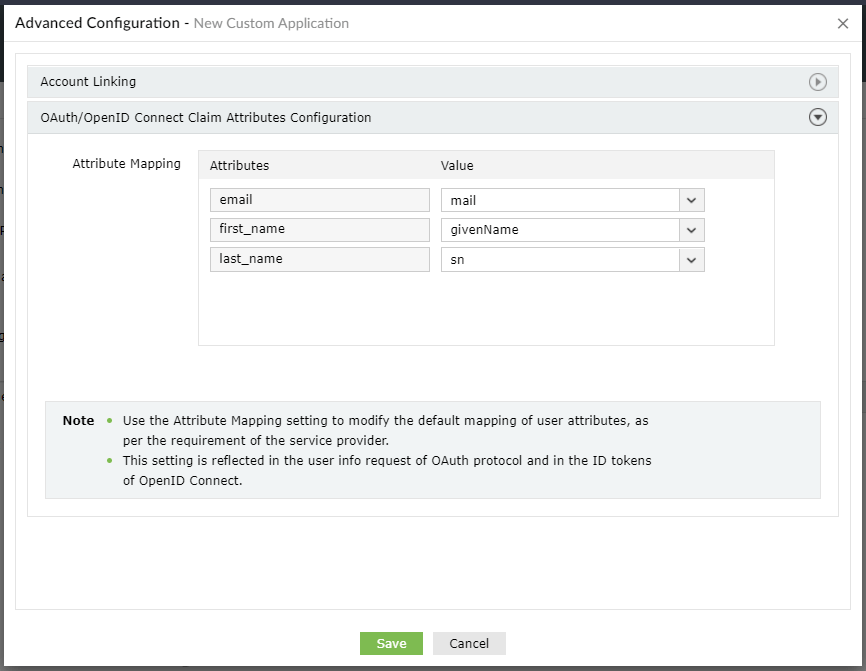
  25. Under OAuth/OpenID Connect Claim Attributes Configuration, map the attributes as given in the image below.
  26. Configure Oauth or OpenID Connect SSO for custom application
  27. Click Create Custom Application.
Go to Top

Copyright © 2023, ZOHO Corp. All Rights Reserved.